Traveling Quilt - Block 1
I had time today to start assembling my center quilt block (for you newbies, like me, a quilt block is basically the basic pattern on a quilt that is repeated. For this quilt, it is my center design that will help communicate my design aesthetic, colors, etc to the next person in line to add to my quilt).
I decided to do something a bit challenging and something that reflected who I am. Luckily I was able to find some super cute fabric at JoAnn Fabrics and I did some searching online to find a pattern that I liked. I landed on the Scandinavian Star block - getting back to my roots! (pictured below)

I had chosen four different fabrics for my quilt block, though, so I had to improvise a tad, which I liked...more of an adventure :)
I followed some of the directions from http://www.aquiltinglife.com/2014/07/scandinavian.html for this block. While it was helpful to get an idea of what pieces I needed, I needed a little extra help actually assembling the pieces. So I've put together a little tutorial to help with the triangular parts.


Line up the corners of the square so the the diagonal line is not intersecting a corner. Be sure right sides are together!

Next, sew on the drawn line. (sorry about the upside down picture - can't figure out how to rotate it)


I decided to do something a bit challenging and something that reflected who I am. Luckily I was able to find some super cute fabric at JoAnn Fabrics and I did some searching online to find a pattern that I liked. I landed on the Scandinavian Star block - getting back to my roots! (pictured below)

I had chosen four different fabrics for my quilt block, though, so I had to improvise a tad, which I liked...more of an adventure :)
I followed some of the directions from http://www.aquiltinglife.com/2014/07/scandinavian.html for this block. While it was helpful to get an idea of what pieces I needed, I needed a little extra help actually assembling the pieces. So I've put together a little tutorial to help with the triangular parts.

First, you cut out a large square. For my pattern, it needed to be 3 inches square. The second square, in a different color is going to be at least half the width of the square, so 1.5-2 inches in my case (I originally goofed up this measurement, actually, but it all turned out fine in the end...just a tad different).

Next, you take the smaller square and on the wrong side, you draw a diagonal line all the way across. This is the line you will sew on.


Next, sew on the drawn line. (sorry about the upside down picture - can't figure out how to rotate it)

Fold the small square back along the diagonal line and iron.

Fold the square back over to its original position and trim the excess fabric, leaving a 1/4" seam allowance. (psst: there is a really helpful youtube video about this, you can watch it here)

I repeated this on the other corner, same process and all. The end result was a house shape:

From there I cut this piece of fabric straight up through the 'steeple' of this house and then sewed the two sides along the opposite sides of each other. (So, in the picture above, the sides on the top and bottom of this picture were sewn together after the square was cut in half...forgot to take a picture of that)

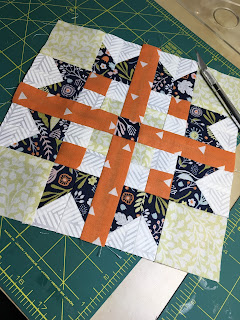
Figuring that bit out was the hardest part of this block. It was a lot of measuring, sewing, cutting, etc, but it is very repetitive so you get the hang of it quickly. And ta-da! The finished product! I simplified it in parts, made it more complex in others, but overall I am very pleased with the result. Excited to see the end result!


Comments
Post a Comment